
Using a WireGuard VPN with Home Assistant
In this guide, let’s follow the steps to set up WireGuard, a modern and high-performance VPN, on your Home Assistant using the WireGuard add-on and an Oracle Free Tier cloud VM running Ubuntu. We will create and configure a site-to-site connection between the two, ensuring secure and seamless communication.
Introduction
Setting up a Home Assistant VPN with WireGuard is a powerful way to ensure secure remote access to your home network. WireGuard is a lightweight, secure, and easy-to-configure VPN that has gained popularity for its simplicity and efficiency. By setting up WireGuard on Home Assistant and an Oracle Free Tier cloud VM, you can create a secure tunnel for your data, ensuring privacy and remote access to your home network. The main reason for creating a site-to-site connection is due to some of the following reasons:
- You could have an ISP assigning you a dynamic public IP address. So your home assistant connects to your Oracle free tier VM with a static IP then the connection is always constant despite the IP change.
- You have an ISP that does not allow port forwarding—for example, having a mobile internet provider that has the inbound ports locked down. So you can’t have clients connecting directly to your home network.
Prerequisites
Before we begin, ensure you have and know the following:
- A Home Assistant setup with Supervisor access.
- An Oracle Cloud account with access to the Free Tier services.
- Basic knowledge of SSH and Linux command-line operations.
- A local machine with an SSH client installed.
Setting Up WireGuard on Home Assistant
Step 1: Install the WireGuard Add-on

- Open Home Assistant and navigate to Supervisor > Add-on Store.
- Please search for the WireGuard add-on and click on it.
- Click “Install” to add the WireGuard add-on to your Home Assistant.
Step 2: Configure the WireGuard Add-on
- Once installed, go to the “Configuration” tab of the WireGuard add-on.
- Enter the following basic configuration:
server:
  host: <YOUR_HOME_ASSISTANT_EXTERNAL_IP> or name (Check the documentation tab for possibilities)
  addresses:
    - 10.0.0.1/24 (This is pre-filled with the container IP you can change it if you need to)
peers:
  - name: oracle-vm
    addresses:
      - 10.0.0.3/32
Replace <YOUR_HOME_ASSISTANT_EXTERNAL_IP> with your Home Assistant’s external IP address.
- Save the configuration and start the WireGuard add-on.
Example configuration below which can differ from yours since I am using a different subnet, but this is up to you what you want to use in your configuration:
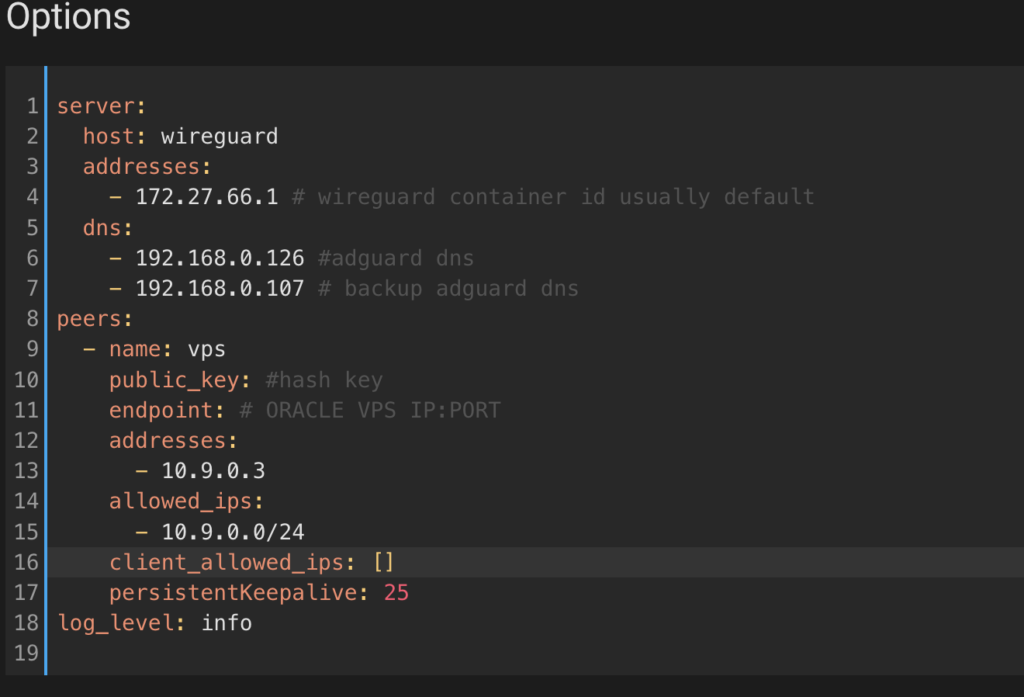
You can leave the below Network tab config alone which sits below the Options tab if you are fine with the default port 51820. Do remember that you will need to forward this port in your network configuration. There is a great resource for port forwarding on the Port Forward website.
Step 3: Retrieve the Public Key
- Go to the “Logs” tab of the WireGuard add-on.
- Note down the public key of the server.

Setting Up WireGuard on Oracle Cloud VM
If you can just get the client to connect to your Home Assistant WireGuard Add-On directly then you can skip creating the Virtual Machine here. This is only required if one of the situations applies which are mentioned at the start in the Introduction.
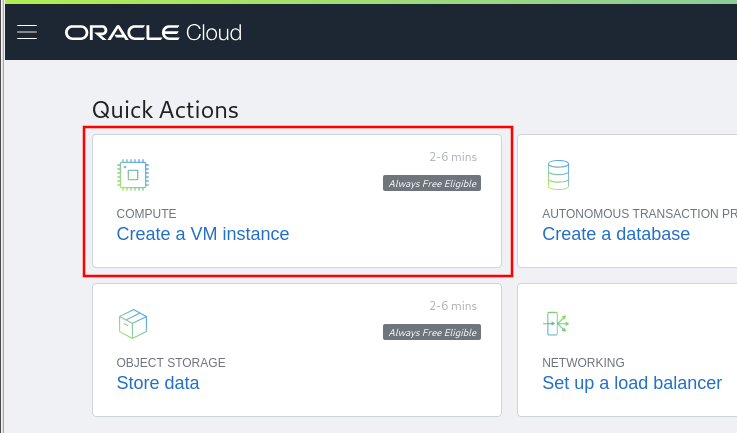
Step 1: Create an Ubuntu VM
- Log in to your Oracle Cloud account.
- Navigate to “Compute” > “Instances”.
- Click “Create Instance” and follow the prompts to set up an Ubuntu VM using the Free Tier options.
Step 2: Install WireGuard on the VM
You will need the public IP of the VM created you can find it in the Oracle Cloud Console:
- Log in to the Oracle Cloud Console with your credentials.
- Navigate to the “Compute” section and select “Instances.”
- Select your VM instance from the list to open its details page.
- Locate the “Public IP Address” field on the instance details page to find the assigned public IP.
Once you have that we can proceed.
- SSH into your Oracle VM using the public IP and your SSH key:
ssh ubuntu@<ORACLE_VM_PUBLIC_IP>- Update the package list and install WireGuard:
sudo apt update
sudo apt install wireguard
Step 3: Configure WireGuard on the VM
- Generate WireGuard keys:
sudo wg genkey | tee privatekey | wg pubkey > publickey- Note down the
privatekeyandpublickey. - Create the WireGuard configuration file:
sudo nano /etc/wireguard/wg0.conf- Add the following configuration:
[Interface]
PrivateKey = <VM_PRIVATE_KEY>
Address = 10.0.0.2/24
ListenPort = 51820

[Peer]
PublicKey = <HOME_ASSISTANT_PUBLIC_KEY>
Endpoint = <YOUR_HOME_ASSISTANT_EXTERNAL_IP>:51820
AllowedIPs = 10.0.0.1/24
Replace <VM_PRIVATE_KEY> with your VM’s private key, <HOME_ASSISTANT_PUBLIC_KEY> with your Home Assistant’s public key, and <YOUR_HOME_ASSISTANT_EXTERNAL_IP> with your Home Assistant’s external IP address.
- Enable and start WireGuard:
sudo systemctl enable wg-quick@wg0
sudo systemctl start wg-quick@wg0
Configuring the Site-to-Site Connection
Step 1: Update Home Assistant Configuration
- Add the VM’s public key and allowed IP to the WireGuard add-on configuration on Home Assistant:
peers:
  - name: oracle-vm
    addresses:
      - 10.0.0.2/32
    public_key: <VM_PUBLIC_KEY>
    allowed_ips:
      - 10.0.0.0/24
Replace <VM_PUBLIC_KEY> with the public key of your Oracle VM.
- Save the configuration and restart the WireGuard add-on.
Step 2: Verify the Connection
- SSH into your Oracle VM.
- Ping the Home Assistant WireGuard interface:
ping 10.0.0.1You should see successful ping responses, indicating that the site-to-site VPN connection is up and running. This means the VPN is working between the Oracle VM and Home Assistant.
Adding a Client Device
To connect a client device, such as an iOS device that I have set up, to the Oracle Cloud VM and gain access to the internal network of Home Assistant, you can also use this for Android and others as well just need to download the corresponding Wireguard app from the store and follow these steps.
Step 2: Generate Client Configuration
- On your Oracle VM, generate a key pair for the iOS device in this example:
sudo wg genkey | tee client_privatekey | wg pubkey > client_publickey- Note down the
client_privatekeyandclient_publickey. - Create a new configuration file for the iOS device:
sudo nano /etc/wireguard/client.conf- Add the following configuration:
[Interface]
PrivateKey = <CLIENT_PRIVATE_KEY>
Address = 10.0.0.3/24

[Peer]
PublicKey = <VM_PUBLIC_KEY>
Endpoint = <ORACLE_VM_PUBLIC_IP>:51820
AllowedIPs = 10.0.0.1/24, 10.0.0.2/24
PersistentKeepalive = 25
Replace <CLIENT_PRIVATE_KEY> with the client’s private key, <VM_PUBLIC_KEY> with your VM’s public key, and <ORACLE_VM_PUBLIC_IP> with your Oracle VM’s public IP address. Regarding the AllowedIPs it depends on what you want if it’s enough to route traffic for you to reach the Home Assistant interface then this should be enough, but if you want to route all traffic through the local network and be able to access other devices remotely. You can do that by using 0.0.0.0/0 in that section. Pro Custodibus has great explanations regarding this.
Step 3: Add Client Configuration to WireGuard
- Add the client’s public key and allowed IP to the WireGuard configuration on the Oracle VM:
[Peer]
PublicKey = <CLIENT_PUBLIC_KEY>
AllowedIPs = 10.0.0.3/32
Replace <CLIENT_PUBLIC_KEY> with the public key of the client.
- Save the configuration and restart WireGuard:
sudo wg addconf /etc/wireguard/wg0.confStep 4: Generate a QR Code for Easy Configuration
- Install the QR code generation tool:
sudo apt install qrencode- Generate the QR code:
qrencode -t ansiutf8 < /etc/wireguard/client.conf- Open the WireGuard app on your iOS device, tap on the ‘+’ icon, and select ‘Scan from QR code’. Scan the displayed QR code. You can then use the toggle to enable the connection. I would suggest testing this on a mobile data connection to not be on the same network at the same time.
If you have a working connection you can continue adding more clients as you wish by incrementing the IP address accordingly.
Testing and Troubleshooting
Testing
- Verify connectivity between devices on the two networks.
- Test accessing Home Assistant from the Oracle VM.
Troubleshooting
- Check the WireGuard status on both Home Assistant and the Oracle VM:
sudo wg show- Ensure correct IP addressing and public/private key pairs.
- Verify firewall rules and network configurations.
For detailed troubleshooting and community support, visit the Home Assistant Community Forums. Your setup, network, and provider could have implications that may need the configuration to be adjusted accordingly. Some networking knowledge is highly advised to understand the inner workings of any connection issues.
Conclusion
Setting up a Home Assistant VPN with WireGuard between Home Assistant and an Oracle Free Tier cloud VM allows remote access to your local network without exposing your devices directly. Some considerations to look up are if not needed later it can be recommended to disable the 22 SSH port on the Oracle VM when not in use to block access or set rules to only allow access from certain IP addresses to enhance the security of the Cloud instance.
I hope this has helped you out!


Recent Comments