
How To Host A WordPress Website With A Reverse Proxy
This was an odd one. The overall objective seemed simple but the information was scattered around for different types of things that can be applied and not exactly what you want to get with this.
But this is to explain how I got a WordPress site working with HTTPS SSL encryption while also reverse proxying requests to a specific server.
Let’s put down the lay of the land first. I use a separate server as my Nginx proxy. It serves as my proxy and can handle Let’s Encrypt certificates to pass them on to where it is configured. Then I use a hosting platform. This is a personal preference thing. Like DigitalOcean, Linode, etc. Whatever you prefer. Let me clear one thing up. You can host a WordPress site in a few clicks much more easily by just using a hosting service as mentioned above and for example, purchasing a domain name. There are plenty of plugins that can do the job for you inside of WordPress itself and you would be good to go in minutes. This is more for the people who had something set up in the past and decided… Hey, why don’t I add another server or configure something new? It gets a little more hands-on at that point.
Anyway, all of this can be done on one machine. My scenario is this. I need to create a certificate and pass on all the incoming requests from one IP to another with HTTPS SSL encryption. Going forward I assume you have a working Nginx configuration already and have some knowledge of a container service like Docker.
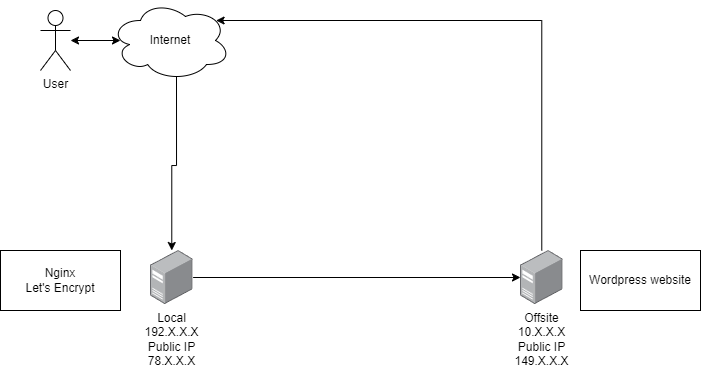
So this is how it starts. A user wants to access the website coupons.com. The website’s domain has a registrar record pointing to the Nginx server on public IP 78.X.X.X Ports 80/443 are open for HTTP/HTTPS requests. The request is received and with the configuration, it is passed on to the offsite IP 149.X.X.X has the actual WordPress website coupons.com and servers it to the user. The drawing is horrible at best but it gets the point across.
Several ways to go about this. You can host either the proxy or website in a container service or not. It’s up to you.
Let’s start with the Nginx proxy. Assuming you have Nginx ready. Usually, my setup goes is that I have website .conf files stored in /etc/nginx/sites-enabled/.
So now we create a coupons.conf file and the contents of it at the start should be like this:
server {
listen 80;
listen [::]:80;

#replace the server name with your domain
server_name coupons.com;

location / {
#replace the IP with your website host machines and if necessary provide the port if it's not a standard one
proxy_pass http://149.X.X.X/;
proxy_buffering off;
proxy_set_header X-Real-IP $remote_addr;
}
You should be done here. Exit out of your text editor while saving. Next, we will use Certbot to get our certificate.
sudo certbot --nginxUsing the command for the first time you will of course get some questions. Like providing an e-mail address. TOS agreements. Opt for a newsletter etc. If you have done this before this will be skipped. It should read through your .conf files and detect the domain name as in example coupons.com. Select them by their appropriate numbers. Select option 2 to redirect HTTP traffic to HTTPS.
If everything goes well you should have a certificate for your specified domain.
You can check the .conf file created earlier and see that the Listen 80 ports have been removed and it has the certificates link and is using the 443 HTTPS port for encrypted communication.
Great! If you try to access the website with the domain now. If all is well you should be able to open up at least the homepage with some errors. Like JS scripts or CSS styles not working. Probably not being able to access the admin dashboard through the coupon.com domain. This is normal and this is where I struggled to find information on how to properly set this up with reverse proxying.
First off let’s go back into the coupons.conf file and add some lines under the
location / {
configuration. Add these two lines in between the curly brackets in the location
location / {

...

proxy_set_header X-Forwarded-Host $host;
proxy_set_header X-Forwarded-Proto $scheme;

...

}
Save out of course. Do a restart of the Nginx service. Of course, before restarting you could test the configuration to make sure there are no errors by using the -t parameter with Nginx.
After this is all done we are now heading over to our WordPress website server. Since we cannot log in to edit some settings. We need to edit the wp_config.php file. This can be accessed in several ways. By using FTP to get into the server. If using a container like Docker you could access the files by attaching them with a bash command exec and edit them from there. But basically whichever way you choose and what flavor of text editor you choose is up to you. The main thing to do in this file is add these additions to it.
At the top or somewhere in between the comments add these lines:
if ($_SERVER['HTTP_X_FORWARDED_PROTO'] == 'https')
$_SERVER['HTTPS']='on';
if (isset($_SERVER['HTTP_X_FORWARDED_HOST'])) {
$_SERVER['HTTP_HOST'] = $_SERVER['HTTP_X_FORWARDED_HOST'];
}
Then at the very bottom add these lines:
// change the domain to what you are using
define('WP_HOME','https://coupons.com');
define('WP_SITEURL','https://coupons.com');
Save and quit the editor. I prefer restarting the WordPress service. Just so that everything boots up nicely with the new configuration. Same as we did with Nginx. Once rebooted I highly suggest trying an incognito browser or clearing your cache I have spent way too much time trying to figure out why it’s still not working or something is not showing just because the website was cached.
So after all that is said and done you should be able not only to see the website in all its glory but to access the /wp-admin/ dashboard too. That’s it! with that said and done this should be a 5-minute read and not hours of searching for specific or non-descript forums using old answers from a cached website through Waybackmachine and situations that don’t help or make things worse.
Hope this helped. More to come!
Some links for setting some of this up from scratch:
Install Certbot
Install Docker
Setup WordPress with Docker


Wow! This guide was an absolute lifesaver! I was struggling for hours trying to get WordPress to work with a reverse proxy and SSL, and most of the solutions I found were either outdated or too vague. Your step-by-step breakdown made everything so much clearer, especially the part about fixing the admin panel login issues—I would’ve never figured that out on my own!
For anyone setting up Nginx from scratch, I highly recommend checking out this guide on install nginx ubuntu 24 https://docs.vultr.com/how-to-install-wordpress-on-a-subdomain-with-nginx. It walks you through the basics before diving into more advanced configurations like this one.
Seriously, I can’t thank you enough for putting this together. You saved me so much time and frustration! Looking forward to more awesome content from you.